我最近折腾 Nginx 反向代理呢,是基于 Oneinstack 安装包 DIY 的。但是遇见了一些问题。好在总算成功了 步骤如下:
必看
需要有好的 linux 基础,未用 Oneinstack 安装过 nginx,如果安装过,那你就需要解压 nginx 文件夹,复制 Oneinstack 的编译文件,挺麻烦的。 至于为什么安装过,就不能重新安装,请看后面。
安装基本组件
yum -y install wget screen curl python #for CentOS/Redhat
# apt-get -y install wget screen curl python #for Debian/Ubuntu
下载和解压 Oneinstack 安装包
wget http://mirrors.linuxeye.com/oneinstack-full.tar.gz #包含源码,国内外均可下载
tar xzf oneinstack-full.tar.gz
修改 nginx.sh 安装文件
进入 Oneinstack 目录下的 include 文件夹,修改 nginx.sh,个人建议用编辑器而不是 vi nano 之类的命令。 正常情况下文件路径为/root/oneinstack/include/nginx.sh 可以看到类似下面的代码:
./configure --prefix=${nginx_install_dir} --user=${run_user} --group=${run_user} --with-http_stub_status_module --with-http_v2_module --with-http_ssl_module --with-http_gzip_static_module --with-http_realip_module --with-http_flv_module --with-http_mp4_module --with-openssl=../openssl-${openssl_ver} --with-pcre=../pcre-${pcre_ver} --with-pcre-jit --with-ld-opt='-ljemalloc' ${nginx_modules_options}
需要添加 --with-http_sub_module,改为
./configure --prefix=${nginx_install_dir} --user=${run_user} --group=${run_user} --with-http_sub_module --with-http_stub_status_module --with-http_v2_module --with-http_ssl_module --with-http_gzip_static_module --with-http_realip_module --with-http_flv_module --with-http_mp4_module --with-openssl=../openssl-${openssl_ver} --with-pcre=../pcre-${pcre_ver} --with-pcre-jit --with-ld-opt='-ljemalloc' ${nginx_modules_options}
保存上传。
安装
执行
cd ~/oneinstack
./install.sh
安装,全部默认,全部 y。 或则只选择安装 Nginx 即可。
配置 Nginx 文件
自行添加网站,配置证书
cd ~/oneinstack
./vhost.sh
新建反代缓存文件夹
mkdir /var/cache/nginx/temp -p
mkdir /var/cache/nginx/cache
chmod 755 -R /var/cache/nginx/cache
修改 conf 文件,一般位于/usr/local/nginx/conf/vhost 文件夹内 conf 文件可以参考我的另一篇文章,我在这儿就不贴了。 Nginx 反向代理 Google Font、Ajax 和 Gravatar 头像 Gitlab:nginx-proxy 直接下载:nginx-proxy-conf
重载 Nginx 配置文件
service nginx reload
遇见的问题
我曾经整理了问题,问了群里的,但是没问出隔所以然来。 这是我整理的问题,以后有时间就看看吧。
失败部分
1.解压 oneinstack ./install.sh 安装 全部默认 全部 y
2.cd oneinstack ./uninstall.sh 只卸载 nginx
3.cd oneinstack/include 修改 nginx.sh 添加 --with-http_sub_module
  ./configure --prefix=${nginx_install_dir} --user=${run_user} --group=${run_user} --with-http_sub_module --with-http_stub_status_module --with-http_v2_module --with-http_ssl_module --with-http_gzip_static_module --with-http_realip_module --with-http_flv_module --with-http_mp4_module --with-openssl=../openssl-${openssl_ver} --with-pcre=../pcre-${pcre_ver} --with-pcre-jit --with-ld-opt='-ljemalloc' ${nginx_modules_options}
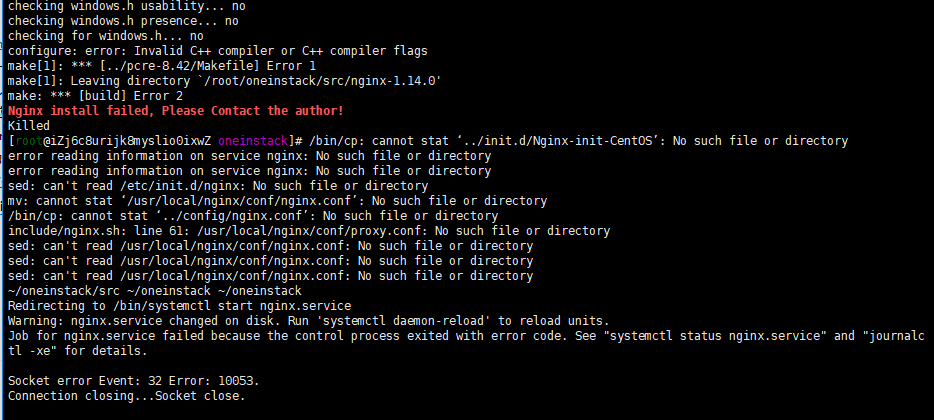
4.cd oneinstack ./install.sh 只安装 nginx 就出现这样的错误了
安装过程中的错误截图:

成功部分
1.解压 oneinstack
2.cd oneinstack/include 修改 nginx.sh 添加 --with-http_sub_module
  ./configure --prefix=${nginx_install_dir} --user=${run_user} --group=${run_user} --with-http_sub_module --with-http_stub_status_module --with-http_v2_module --with-http_ssl_module --with-http_gzip_static_module --with-http_realip_module --with-http_flv_module --with-http_mp4_module --with-openssl=../openssl-${openssl_ver} --with-pcre=../pcre-${pcre_ver} --with-pcre-jit --with-ld-opt='-ljemalloc' ${nginx_modules_options}
3../install.sh 安装 全部默认 全部 y